Our Christmas OFFER is live now, Get 15% OFF on all services. Click Here

Location

Buffalo, NY

Call Us

+1 716-710-0390

What you need to know about winter composting

Learn how to keep your compost pile hot when the weather is below freezing.

Just because the weather is cold or outright icy and snowy doesn’t mean your outdoor compost pile has to hibernate for the winter. After all, there are still kitchen scraps, leaves, and other materials to deal with.

Even in cold weather, composting outdoors during the winter is relatively simple. Compost piles aren’t very productive, but that’s okay. I won’t be doing any gardening during those months anyway. The arrival of spring will give you a head start on compost production for the rest of the year.

The following steps will help you continue composting outdoors throughout the winter.

How much you engage in composting in the winter will depend on how ambitious you are, but in most cases, you won’t need to do much. The smaller the compost pile, the more likely it is that the process will not slow down at all or even stop in the coldest months.

The main goal is to keep the center of the compost pile or bin hot enough to activate the bacteria inside. The best way to do this is to simply add the ingredients and let nature take its course. Most experts do not recommend turning over piles much during the winter.

Cut or shred any additives, especially brown material, that will help the compost build up over the winter. The smaller the pieces, the faster they will break down.

The basics of composting

Compost piles and bins vary greatly in size and complexity. It all depends on personal preference and how much material you produce for composting. One person with a small yard can make much less compost than a family of four or more with an acre of land. If the process seems overwhelming, start small.

The general guidelines for composting are the same whether it is summer or winter. You want to add a mixture of “green” ingredients that provide nitrogen. This includes kitchen scraps, coffee grounds, plant trimmings, etc. You can also add pesticide-free, preferably herbicide-free, green lawn mowing. Spread the latter out so they don’t stick together and rob you of much-needed oxygen.

It is also a good idea to include a ‘brown’ material that adds carbon. Good choices include cardboard, newspaper, brown paper, leaves, dry grass clippings, brown thatch, sawdust, and wood shavings.

Add twice as much brown stuff as you would add to the pile. For best results, layer the brown material on the bottom and top of the pile. Lastly, add some water. Greywater from the kitchen or shower works well. This will keep the pile moist. Depending on how dedicated you are, replace them every few days or every two weeks from spring through fall. Give it a little spin in the winter. You don’t want to disturb the warm center too much, and with a lot of snow it’s too much work.

Learn more about composting

Fallen leaves can be good food for your winter compost pile, but too many can upset the overall balance. Maintain an ideal ratio of no more than two-thirds of leaves for every one-third of green waste. It’s also best to tear it into small pieces to avoid lumps.

Avoid using evergreen leaves as they decompose much more slowly than leaves of other trees. Other leaves to avoid include black walnut and eucalyptus leaves, which contain natural herbicides. Oak leaves are used sparingly, using only 10-20% of the “brown” material.

If you have a lot of leaves or don’t want to tear them up, consider building a pile of leaves in another corner of your yard. It will break down much more slowly than a standard compost pile, but if you’re willing to wait, you’ll eventually have a great mulch to add to your garden.

Organize your garden

Getting started

The easiest way is to continue adding to the pile or bin throughout the winter. There may not be much compost available in early spring, but once the weather changes, things warm up quickly and production begins.

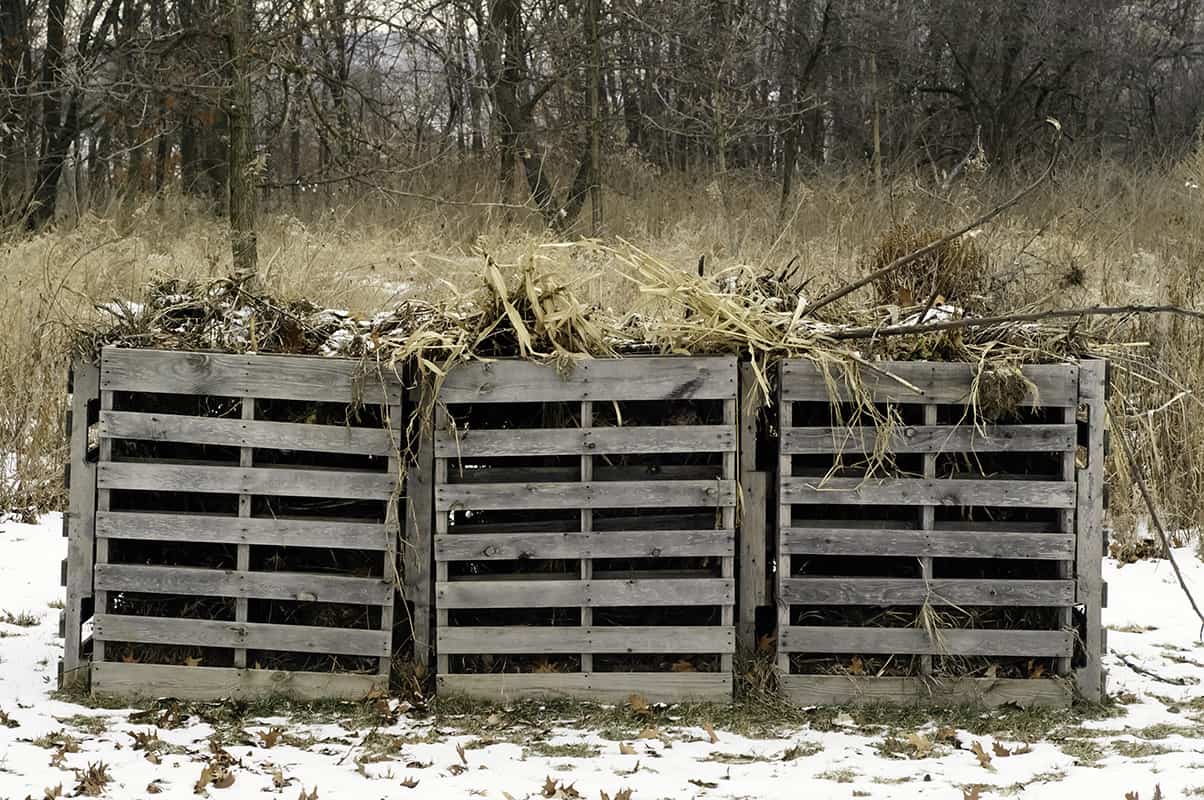
If you store your compost in a simple pile, place it in a sunny area if possible and aim for 1 cubic yard of compost. This will ensure there is enough insulation to keep the center of the pile warm.

Adding more material throughout the winter may require digging up the pile or removing snow or ice.

To add a little more winter protection and keep things tidy, you can build a wall around the pile. There are elaborate systems, but you can also use concrete blocks or straw bales to collect compost. Building against a wall or fence facing south or west also takes advantage of reflected solar heat to keep the compost warm.

Find your compost bin

Hinged roofs serve three purposes: Prevents compost from being used by large animals looking for food. This will help keep your compost warm regardless of the climate. And if you live in a climate that gets a lot of snow, this will help keep rain and snow out of the compost itself.

To keep the pile moist, moisture must be replenished from spring to fall, and even in winter, low humidity or dry winds that bring too much rain or snow can “drown” the microorganisms in the pile. If this happens, adding more “brown” material, such as shredded cardboard, may help absorb moisture.

Another option is to bury compost in your garden. It takes a little more work to set up and maintain because you have to dig and maintain a space for the compost, including keeping the materials in place and discouraging animals. If you choose a place to plant in the spring, such as a vegetable garden, you will already have plenty of materials available for use in the spring.

One way to do this is to spread rows of compost over your vegetable garden rows after you’ve harvested everything you need for the season. It is advisable to dig the soil a little deeper to provide insulation for the material. Then fill it with kitchen scraps and other compostable materials.

Another neat option is to cut off the bottom of a plastic trash can and bury it in the dirt. This creates insulation that keeps things warm. Typically, you may need several, depending on the amount of green waste you generate.
You can also add a roof or tarp over the pile to keep it neater.

Then, when spring comes, enjoy the comfort of your winter landscape, knowing that you’ll be one of the first to receive free homemade fertilizer for a beautiful, productive garden.

More
Start garden planning early, even if it snows 
Planting time: start your garden from seeds 

Research plants before buying

Taking the time to inspect your plants before you buy (by yourself or with a landscaper) can save you more time, money, maintenance, and buyer regrets. Before buying a plant for your garden, find out the answers to these important questions:


Are they native or adapted to your climate? Plants that are not adapted to the local climate require more resources (water, fertilizer, maintenance) to survive, often with disappointing results.


What kind of exposure do you need: full sun, part shade or full shade? One of the most common gardening mistakes is putting new plants in the wrong light, making it difficult for them to survive.


Work with a gardener near you.


How big is it? Small plants in nurseries can reproduce if buried in the ground for a few years. This shrub stands 1 foot tall and 1 foot wide and will quickly grow to 6 feet tall and wide, leaving behind a lush landscape. Be prepared for the mature size of the plant you choose, and make sure it has plenty of room to grow.


What type of maintenance does your factory need? Most native plants are generally low maintenance, but low maintenance plants may require a lot of unnecessary pruning, watering and fertilizing.


Answers to these questions can often be found in plant labels. Local plant care professionals can also be a good resource for asking these questions. Or work with a local gardener to learn more about plants that grow well in your area.


Healthy plant options


This particular trick sounds simple enough, but you need to look at both the top and bottom of the plant to understand its health.


Look for healthy leaves that haven’t turned brown or yellow. This could be a sign of dehydration or excess. If the soil in the container is wet or smells, get out and walk away.


Check the leaves and stems for signs of insects or disease. Chewed leaves and webbing can be signs of infection. Plants with light or dark spots on their leaves are prone to disease, so it’s best to avoid them and not accidentally contaminate existing plants in your garden.


You may be tempted to buy plants that will flower, but if you’ve chosen one that doesn’t flower or doesn’t flower at all, it’s best to skip it. This doesn’t make much sense at first because we all want beautiful flowering plants over non-flowering ones. Reasons to choose non-flowering plants: Due to the stress of transplanting, flowers often drop shortly after planting. Also, while the plants are still in the nursery, most of the flowering season has dried up. Non-flowering plants start blooming as soon as they hit the ground, allowing you to enjoy the full bloom.


When it comes to plant health, there are more to check than the above. Before purchasing a plant, you should also check the roots. Sometimes, if you leave the seedlings in the container for too long, the roots will grow in a ring around the root ball, slowly uniting the plant with the roots.
Plants with roots are difficult to grow because the roots continue to grow around them instead of deep into the soil where they can get water and nutrients. Eventually, the rooted plant dies.


If you have a rooting plant, you may be able to fix this by taking a sharp knife and making a lengthwise cut about 2 to 3 inches around the entire root from the top to the bottom of the root mass. This breaks the circular growth pattern and helps the roots grow outward into the soil.


Choose small trees and plants that are easy to transplant


You may want to have the largest tree possible in your nursery, but you may be surprised to learn that large plants take longer to grow than smaller ones after transplanting. The reason is that the smaller plants are younger and don’t need as many roots to support upward growth. After planting, the roots grow outward, and the upper part grows rapidly. Also, larger plants require more root growth, and containers limit the amount of root growth you can get. Due to the plant’s age and large size, it may take longer to establish itself in the landscape. This is a popular trick because it not only saves money but also makes digging easier. A moderately sized hole about three times the width of the root ball.


Dig a hole three times the width of the root ball


Contrary to popular belief, most of a plant’s root system grows outward. Digging a hole that is wider than the root ball will allow the roots to grow faster, allowing the plant to grow faster. The depth of the hole should be the same as the root ball or 2 inches shallower, as it will sink after planting.
This is an example of a hole that is not wide enough. As a tree grows, it takes longer for healthy roots to grow, and longer for upward growth.

Black-footed daisy (Melampodium leucanthum) native to the Southwest. (Add a Photo)

When planting non-native plants, amend the soil with compost
Compost increases the water-holding capacity of sandy soils while reducing the weight of clay soils. It also benefits native plants by adding nutrients and microbes to the soil. A good guideline is to add one part compost to one-part native soil and mix them together before planting.
Native plants that have adapted to the soil in your area usually don’t need the addition of soil amendments unless the soil’s drainage or ability to hold water needs to be improved.

Connect Drip Irrigation to New Plants (Add a Photo)


Do not immediately fertilize newly planted plants


When a plant is first transplanted, it uses most of its energy to grow more roots. Once they have a good root system, the plants start to focus on the tallest growth (the part visible above ground). Fertilizing right after planting disrupts the natural cycle, allowing the plant to focus on maximum growth without root support.
➢ For non-native plants, wait to fertilize until new growth appears.
➢ For fruit trees, it is best to fertilize one year after planting.
➢ Once established, native plants usually don’t need fertilizer. Fertilizing native plants can actually backfire. It promotes the growth of more leaves but may produce fewer flowers.


Water new plants deeply and often


New plants need more water than plants that have been in the landscape for more than a year. Daily watering may be required for the first week after planting, then gradually reduce the frequency until the plant can be watered on the same schedule as other plants after a year in the ground.
Watering frequency depends on plant type, climate, soil, and irrigation method used (hose, sprinkler, drip). The nursery where you purchased your plants should be able to provide detailed instructions on how often to water new plants. You can also contact your local gardener’s office for free advice. Many local governments have useful information on how often to water plants in their area. 


Add a layer of mulch around new plants


Mulching adds an extra layer of protection to plants, especially new ones. A 2- to 4-inch-thick layer of mulch will help retain soil moisture, keep the soil cool in summer and warm in winter, and keep weeds out.
When applying mulch, it is important not to touch the roots of trees or plants, as this creates a warm, moist area where diseases and insects can thrive. In general, the mulch should be at least 3 to 6 inches from the base of the plant.


Be patient as new plants grow


This is probably the hardest tip to follow. After all the work we put into selecting and planting our new landscaping, we want to see immediate results, not small, bony plants with lots of open space. The temptation at this point is to overplant the area. This will make your garden look great at first, but as the plants grow and increase in size, they can quickly become overcrowded, ruining your carefully crafted and carefully designed landscaping. If empty spaces in your new landscape continue to bother you, plant short-lived perennials or annuals between seedlings until the new plants are fully established.


Enjoy the fruits of your fall planting


With a little research at the right time, healthy plants, openings, proper watering, and mulching, the plants you add in the fall will quickly grow into beautiful mature shapes that will make you dream of vividly beautiful landscapes.

Call us at this number +1 (716)-710-0390.

Leave a Reply

Your email address will not be published. Required fields are marked *